In short
- Every carriage has to go to the platform once, so par is simply the number of carriages plus the fewest parking moves possible. The only moves you can save are the parking moves.
- Carriages of the same colour are interchangeable. Spend the one that is in the way and keep the free one for later.
- Never park a carriage on top of one the engine still needs. Keep an empty siding if you can: it is your workbench.
- Undo is free. It takes the move off your count as well.
The basics
The yard has a platform at the top and a few sidings below it. Coloured carriages stand on the sidings. Only the carriage at the front of a siding, the right-hand end nearest the junction, can move. The rest are stuck behind it until it goes.
An engine waits at the platform with an order card: the carriages it wants, in order, shown as dashed slots behind it. A move takes the front carriage of one siding and does one of two things:
- Parks it at the front of another siding, if that siding has room.
- Couples it to the engine, but only if it is exactly the next carriage on the card. The engine shakes and refuses anything else.
When the card is complete, the train leaves and the next engine pulls in. Send every train away to clear the yard. There is no clock.
To play, tap a siding (or any carriage on it) to lift its front carriage, then tap another siding or the platform. Tap the same siding again, or press Escape, to put it back down. On a keyboard, keys 1 to 5 pick sidings, P or 0 is the platform, U is undo and H is a hint. Shortcut: if nothing is lifted and exactly one front carriage is the one the engine wants, tapping the platform fetches it for you.
Colours and symbols
Every carriage and order-card slot carries a shape as well as a colour, so you never have to tell two shades apart:
| Red | ● circle |
|---|---|
| Blue | ▲ triangle |
| Yellow | ■ square |
| Green | ◆ diamond |
| Purple | ★ star |
| Orange | ✚ cross |
The "Next" strip above the yard shows up to three order cards still to come. Check it before parking.
Par and stars
Every yard has been solved by the computer, which searches for the shortest possible solution. That number of moves is par. Stars depend only on your move count when the last train leaves:
| ★★★ | At par (it is impossible to beat it). |
|---|---|
| ★★ | Up to three moves over par. |
| ★ | Any finish more than three over. |
The key idea: every carriage in the yard belongs to some order, so every one of them has to make exactly one trip to the platform. Those moves are fixed. The only moves you control are the parking moves, so par is the number of carriages plus the fewest parking moves the yard allows. When we ran the solver on 200 yards, par needed only one or two parking moves on average for the easier yards and about three for the hardest. If you have parked far more carriages than that, stop and think, or press Undo.
Same colour, different carriage
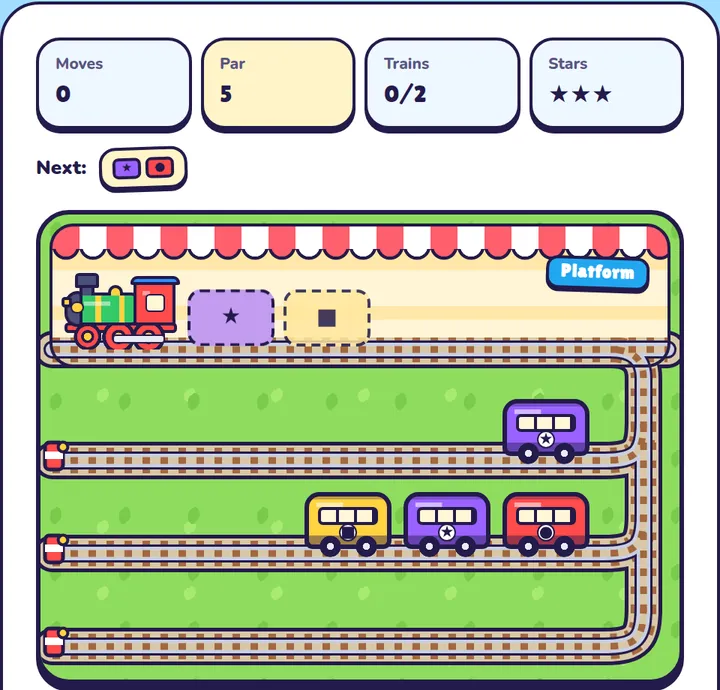
Two carriages of the same colour are completely interchangeable, so choose which one to spend. Take the yard in the first picture. The engine wants purple, then yellow. There is a free purple on siding 1, so it is tempting to couple it straight away. But the yellow is buried under a second purple and a red on siding 2, and digging it out costs two parking moves. That makes 6 moves, one over par.
The par solution in 5 moves:
- Park the red from siding 2 on the empty siding 3.
- Couple the purple from siding 2. It was in the way anyway.
- Couple the yellow. The first train leaves.
- Couple the free purple from siding 1 to the second engine.
- Couple the red from siding 3. Done.
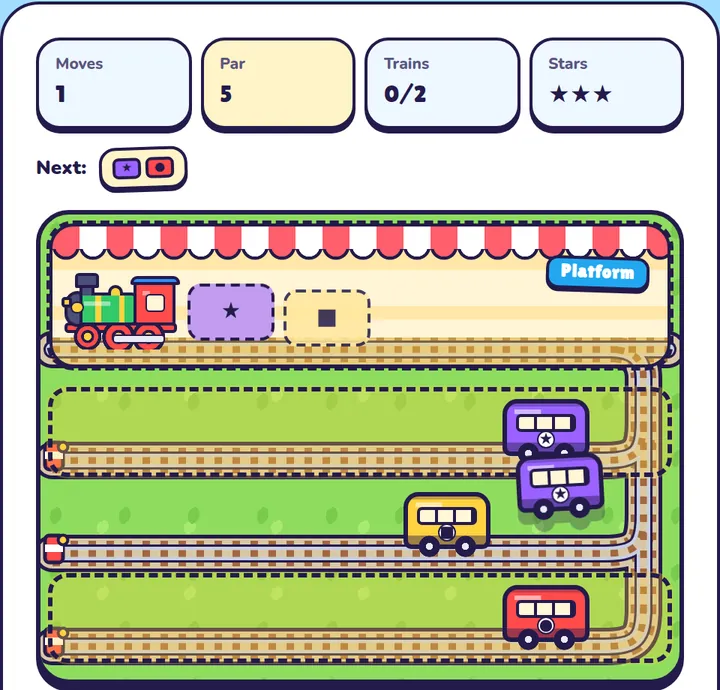
Coupling a matching carriage at once is right most of the time. Before you do, ask: is another carriage of this colour sitting on top of something I need? If so, use that one instead.
Digging out the next carriage
Most of the game is digging out a buried carriage. Count first: two carriages in front of the one you need means two parking moves you cannot avoid, so make each one count:
- Never park on a carriage the current train still needs. You would only have to dig it out again.
- Park on a carriage the trains will need last. A carriage that is only wanted by the final order can carry a stack for a long time.
- Stack same on same. In the solver's par solutions, about one parking move in four put a carriage on top of one of the same colour. Later, either one can go first, so the pair blocks nothing.
The empty siding is your buffer
An empty siding blocks nothing, which makes it the safest place to park. On easy and medium yards about half of all parking moves in the par solutions went to an empty siding. Use it as a temporary shelf and clear it as soon as the orders let you. Filling your last empty siding with a carriage nobody needs soon is how yards jam up. Mind the space as well: sidings hold four carriages on the early levels and five later, and the game will not let you park on a full one.
Think a train ahead
On the hard levels there are three or four trains, and a parking move for this train decides how easy the next one is. Look at the yard below. Its first engine wanted blue, purple, purple, and the blue was stuck behind a red on siding 1. There were four places to park that red. Two of them, sidings 2 and 4, would have buried a purple the engine needed, and the solver confirms each costs a move. Siding 5 was a good choice, and it paid off: the red now sits at the front of a siding that reads red, green, purple, exactly the start of the next order.
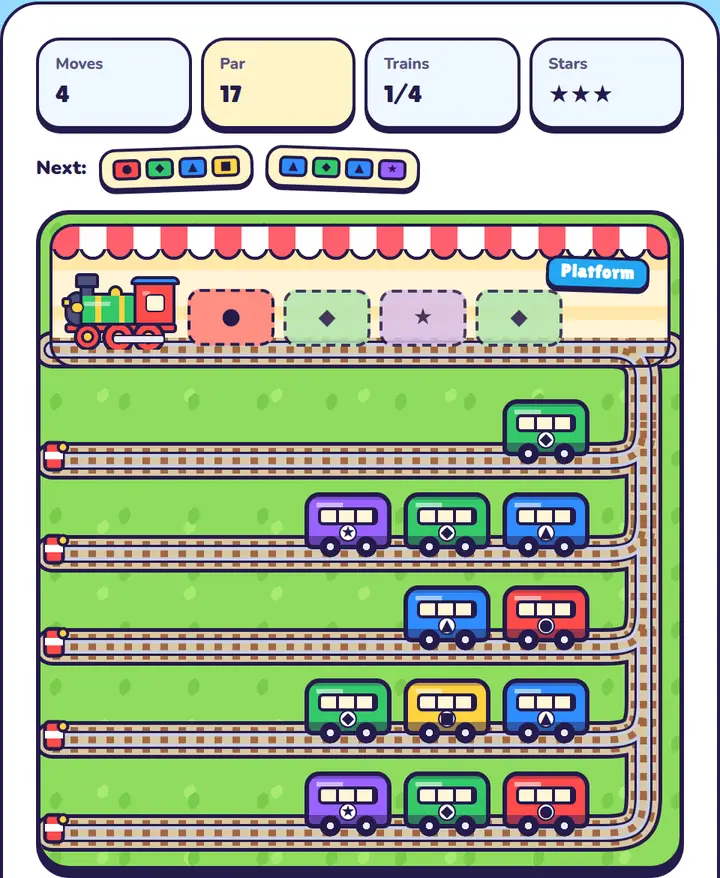
A siding that reads, front to back, like an upcoming order card is perfect.
Hints, undo and restart
- Hint (3 per yard): the solver works out a shortest solution from where you are now, lifts the right carriage and flashes where it should go. It works even after mistakes. Hints never cost stars.
- Undo: unlimited, and the move comes off your counter, so exploring costs nothing.
- Restart: puts the yard back to the start with zero moves. Hints you have used stay used.
Levels, the daily yard and bonus cards
Levels 1 to 3 are easy: three sidings, two short trains and three colours. Levels 4 to 8 add a fourth siding, a third train and a fourth colour. From level 9 sidings hold five carriages and trains grow to three or four carriages each. From level 15 you get five sidings and five colours. Each time you start a level you get a freshly made yard; the "Try for par" button on the finish screen replays the same one. The daily yard, a medium yard that is the same for everyone that day, keeps a separate streak.
After clearing a level you turn over one of three face-down bonus cards. Each is one of four kinds, for your next level: two extra hints, three extra hints, or the yard shunter, who makes your first two or three moves for you. The shunter plays the opening of the computer's own par solution, so those moves never cost you a star. Cards are not used on the daily yard.
Ready to try it? It's free and runs in your browser.
Play Train Yard